Programming Your Keypad
Warning
This guide is NOT for remapping keys. Even if you do reprogram the keypad, you will only be reverting back to the default keymappings. If you’d like to remap your keys, follow the remapping guide.
Visual Studio Code
VS Code is Microsoft’s text editor that makes compiling code extremely easy with extensions. I previously recommended Atom for this install guide, but since PlatformIO now officially recommends VS Code and it does a few things better, I have updated the guide accordingly.

Download
Download and install VS Code from the link here:
You’ll also need Git so download and install it from here. Leave all defaults selected during installation.
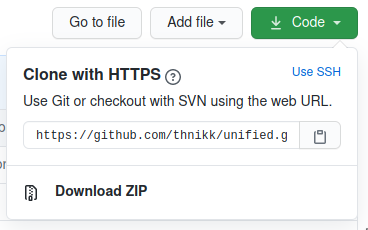
You also need to download the code for your keypad. Click the link for your respective model to go to the GitHub page that contains the necessary code. Click the “Code” button in the top right and then select “download zip.” Extract it to wherever you like (I would recommend your desktop or documents folder.)

Install the PlatformIO extension
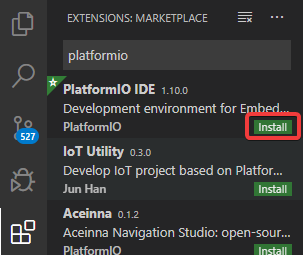
PlatformIO is what converts the code into something the keypad can understand. To install it, open VS Code and click on the icon with the 3 connected squares and one floating square in the side bar.

From here, you can type “platformio” into the search bar and click the install button Platformio IDE. Restart if it prompts you to.

Uploading the code to the keypad
Now you can go to File>Open Folder and select the folder you extracted from the GitHub download. The folder you open should contain another folder called src.

Now you can click on the PlatformIO logo (the ant head) in the side bar. If you have anything starting with “Env” under project tasks, click the one for your corresponding model to expand the menu.
Warning
If you’re uploading code for the 7K model, look at the bottom of your keypad. If it says 3v on it, make sure to select the 3v environment. Failure to do so will require to open the keypad and force reset it to upload the code again.

Now click upload and you should see a terminal pop up on the bottom of the screen start spitting out information. When it’s done, you should see the environment you selected with “SUCCESS” next to it, meaning your keypad has been programmed!

If the build fails, you should be able to scroll up to see an error message in red. If you can’t figure out what the problem is (ones related to upload port usually mean the keypad isn’t plugged in or you’re using a bad USB cable,) please message me on Etsy with your error message and I’ll do my best to help you.
Atom (DEPRECATED)
Warning
This is an older version of the guide using Atom instead of VS Code. It should still work, but it may ask you to install Git, which you need to reboot your machine for after. VS Code is the preferred method due to its simplicity. If you HATE proprietary software and refuse to use VS Code, I would recommend using VSCodium, an open source version of VS Code. The folders containing the source code have also been renamed, so if you get stuck on the uploading step, just be aware that trinketm0 > trinketM0.ino has become src > src.ino.
Atom is a text editor made by GitHub, but has become somewhat redundant as GitHub was purchased by Microsoft. As such, and due to the recommendation from PlatformIO, I recommend using VS Code instead. If you would still like to proceed, you may have to install git and reboot your machine when prompted.
Download Atom
Download and install Atom from here: https://atom.io/
Install PlatformIO
Launch atom and press ctrl and comma which will open the settings menu. Click on install, type “platformio” into the search box and hit enter. Click install on “platformio-ide” and wait for it to install. It should ask if you want to install clang for auto-completion but it’s not necessary so you can just ignore it. When the installation finishes, you should see a button in the top right that tells you to restart to apply the changes. Hit restart and you’re good to go!
Download the Code
Click the link for your respective model to go to the GitHub page that contains the necessary code. Click the “clone or download” button and then select “download zip.” Extract it to wherever you like (I would recommend your desktop or documents folder.)
Uploading the code

Open the folder in Atom that you just extracted from the zip that contains the “platformio.ini” file and it should show up in the left panel under “Project.” It should be called <code>-master, but make sure it’s the one that contains platformio.ini since there can be two of the folders depending on how you extracted the zip. Click on the folder with the same title as the parent folder and open the file with the same title with the .ino extension (which should be something like trinketM0-master > trinketM0 > trinketM0.ino, the names will be different depending on the code you’re using). Make sure your keypad is plugged in and press F7. Type “upload” and select the correct option for your model (if you don’t select the model, it will try to upload all of them so make sure to do this.) You may need to try a few times and if it tells you that it can’t find the port, just try unplugging the keypad and plugging it back in. If all goes well, it should upload the code to the keypad!
Making Changes to the Firmware
There are some things you should familiarize yourself with before you get started. These are the most important functions/libararies.
digitalRead() for reading button inputs.
The neopixel library for controlling RGB LEDs.
The EEPROM library for persistent settings.
Arrays for variables in for loops.
Data types for variables in general.
I wouldn’t recommend trying to change random variables unless you can actually follow the logic and see exactly what they’re changing. Some of them may tie in somewhere else and cause unexpected results. Future versions of the firmware will make changes easier by separating variables based on editable settings and things like counters which should never be changed.
If you’d really like to learn, starting with the absolute basics, I would recommend starting with a simple blink sketch using the Arduino IDE. It’s easy to pull up and edit, and it’s also easy to start combining the blink sketch with a button sketch to make one of the keys activate the LED, etc. Example sketches are extremely helpful for learning, and creating a basic sketch that can press z and x with the two main keys from examples you can follow will do a lot more for you than reading though pages on specific things.